
A Complete Guide On Your First Clamming Experience
Clams are always welcomed in any seafood dish because of how delicious they are, but nothing beats the flavor you get from a fresh clam that you caught yourself. Fishing for clams is an enjoyable activity that’s a lot easier than many people think, and doing it correctly can secure you a delicious meal.
Get the right equipment
To go clamming, you will need some rubber boots and drake waders to help you walk around the wet sands of the bay area without damaging your feet, a bucket to place your clams in, and a clamming shovel to get the clams out of the sand. That’s practically all you need to start clamming, but more experienced clammers recommend you get sunscreen and some garbage bags to put your equipment in as you don’t want your car to be full of sand at the end of your trip.
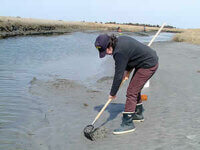
Learn the right digging methods
Before you start digging, you need to find the place where the clams are, as they’re usually hidden in the sand. Head to the parts of the bay that contain both a little seaweed and holes in the sand; that’s usually where the clams are. Once you’re settled in the right spot, start digging with your shovel. Some are hidden up to two feet in the sand, but you’re almost guaranteed to get a few smaller ones with the first swing of your shovel.
Get the required fishing license
Different states require different licenses to go clamming, but they’re usually very easy to obtain. If you’re going to a beginner-friendly bay area on the west coast, you should consider clamming in Bodega Bay as it’s one of the best places to start your clamming experience. One of the requirements, however, is to acquire a California Fishing license. You can apply for it online so get started on that before you go on your trip.
Clean them correctly
To clean your clams, you need to place them in a bucket with about a gallon of seawater. Then add, approximately, a cup of cornmeal for every 30 clams in the bucket as it extracts any sand or mud inside them and cleans them out from the inside. This process can take up to 24 hours to finish, so starting it as fast as possible will help you get your clams ready faster. Swap out the cornmeal every 4-6 hours and keep the temperature of the clams below 50 degrees to ensure it remains safe to eat. Once they’re cleaned, you can then begin cooking them using any recipe you want.
The best thing about clamming is that it’s really easy to do for anyone as it doesn’t require expensive gear or any technical skill. Your first clamming experience is almost guaranteed to be successful and, over time, you’ll realize how to improve your experiences even further by learning where to find the biggest clams and what time of day to start your trip. Remember to use sunblock to protect your skin from the sun.
2 thoughts on “A Complete Guide On Your First Clamming Experience”
Comments are closed.


Personally I prefer using a good pair of waders to go clamming so I don’t have to worry about getting wet from the tide coming in and I can go into slightly deeper water. As for tools, a good clamming rake and clam gun is pretty much all you need. Shovels are a bit more work but can be pretty effective if you don’t mind putting your back into it. Then all you need is something to measure them with and a good clam basket or bag (preferably with a waist attachment) and you’re good to go!
Great advice, thanks!